Wednesday 29 June 2011

Fun with... pizza dough!

Pizza dough cinnamon rolls

Both girls had a friend over for a sleep over (sisters too!). They had a lot of fun together, and though I know that at this age they can play together really well without 'help' of a grown up, I did foresee a couple of activities to do together. One of them was baking. M. had a pizza atelier a little while ago with her friends for her birthday and there they made 'viennoises au chocolate' with left over dough. A great idea, if you ask me. This reminded me of a recipe I read somewhere (I can't remember where, unfortunately) for cinnamon bread sticks made from pizza dough. Instead of bread sticks, we decided to make cinnamon rolls and to give the chocolate viennoise a try as well. We had no idea how both of these would turn out but it was worth a try, we figured. We split up in two teams and made two delicious snacks in no time!

Keep on reading if you want to give this a try. As you'll notice it's all very intuitive - you can't go wrong really.

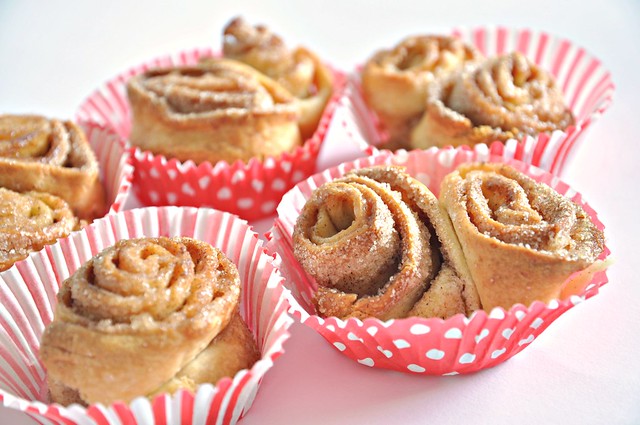
For the cinnamon rolls you'll need one package of pizza dough - ours was not frozen and already rolled out which made it even simpler. If yours is frozen, let thaw and then roll out the dough with a rolling pin, the way you would for a pizza. With a brush spread melted butter over the entire surface of the dough, next sprinkle the entire surface with sugar and cinnamon. Roll the dough now to obtain a log. Cut the log into 1-1 1/2 inch pieces. Place each one of them in a muffin pan lined with cup cake liners (unfortunately, I just had the girls grease the pan - I'm soaking the sticky pan with baking soda now, in an attempt to get the melted sugar off... I added the liners for the picture and to hide what's missing... LOL). Bake in a 350°F oven for about 20-25 min or until golden and the sugar bubbling. Let cool on a wire rack. Easy!!

Viennoise au chocolat

Even more easy are the pizza dough viennoise au chocolat. Same here, roll out your dough, as you would when making pizza. Sprinkle some chocolate chips in a line at one end of the circle, next roll the dough such that the chocolate chips disappear inside, sprinkle some more chocolate along the fold, roll, sprinkle, roll,... and continue like this until you've obtained a log. With a sharp knife make some cuts on top. Brush the top with  melted butter and bake in a 350°F oven for about 20 minutes or until golden. Let cool on a wire rack. Bon appétit!

Note: Our cinnamon rolls were really crispy (and SO yummy!) because the dough was rolled out really thin - if you like them moist and soft, use more butter and roll out the dough less. Adjust the baking time if necessary.

Monday 27 June 2011

Tomorrow...


... is the last day of school here. The last weeks just flew by and so many things happened (and other things did not happen...)
M.'s surgery went well last week - her hearing improved dramatically, which made her really happy and us too.
All the 'spectacles', recitals, presentations, ... are behind us and so are most of the birthday parties.
As of Wednesday we can pick up a slower pace - at least for a while. And this will be much appreciated by us all...


The bracelets in the pictures are some of the teacher appreciation gifts we made tonight - the girls picked the beads with care at our favorite beading shop (right before closing time - I'm such a good planner) and I tied the knots. They're easy to make - all you need to know is how to tie a sliding knot. The pictures of the finished bracelets aren't great - I've been having some white balance and exposure issues lately (probably one of the settings on my camera got messed up) but haven't had the time to take a proper look at. But I will have now! As of tomorrow!! Maybe...


Monday 20 June 2011

An afternoon through the lens


When I asked M. what she'd liked to do for the afternoon yesterday while little sis was gone to a birthday party, she said "I want you to teach me how to use the camera". She was referring to my old camera, my Nikon D40, the first DSLR I ever bought. I use a D90 now, but held on to the the much lighter D40 for special purposes and to teach my kids one day. Well it seems like that day has come.

M. new exactly what she wanted to do - walk around the neighborhood and take pictures. So, off we went, both equipped with a camera. The afternoon flew by. It was fun and interesting at the same time, in the sense that even though you walk on the same street, you see different things or the same things differently. I really liked our little photographic experiment and I hope there will be more to follow.

As for now, I'm really proud to show you a couple of the shots my eleven year old made.

She's got talent and a good eye, if you ask me...

Wishing you a happy Monday,

P.


Vide grenier

Friday 17 June 2011

Yolk


We had a pasta salad the other night - nothing fancy but it makes a fast and easy dinner and everyone likes it here. I boiled a couple of eggs for the occasion and had one left. I put it in the fridge and as I did I remembered something I read a long time ago, in my jewelry making days: you can oxidize sterling silver using a hard-boiled egg. I love silver with an antiqued look, however, scared of all the chemicals used to get the result, I never came around doing it myself. And eggs were a big no as little H. still suffered from a severe egg allergy back then. But not anymore!
So off I went to find some jewelry that could use a little boost.

Turns out the technique works like a charm! It's easy, fast, cheap and more importantly absolutely safe (unless you're allergic to eggs that is). Here's how I did it goes:

Oxidizing silver

1. Take a hard boiled egg and put it in a Ziploc bag. Close the bag.
2. Smash it (this is fun! - no need to peel the egg).
3. Open the bag and add your jewelry (yes, this may seem gross). Close the bag. And let it sit for awhile. The sulfur from the egg yolk will take care of the oxidizing process. Shake the bag from time to time - don't worry about getting the egg everywhere on your jewelry, this will be taken care of later. Check from time to time to see how the darkening is going.
4. When satisfied with the result take out the jewelry and discard the bag with the egg (make sure not to leave any precious jewelry behind before throwing it out!).  Gently wash your jewelry with a mild soap (dish washing liquid works fine) and rinse well. Dry with a soft towel.
5. Finish off by buffing the silver here and there with a silver cleaning cloth. And done!

I have no idea how long the antiqued look will last - I tend not to take off jewelry when taking a bath or shower - but given the simplicity of the process I don't mind repeating it once in a while. Writing down everything actually took me longer than taking care of the silver.

Do you have any Aha-uses sitting in your fridge or on your shelves? Feel free to add them in the comment section to this post!

Wednesday 15 June 2011

Buzzzy

Whimsical pillow

Only two more weeks left and the school year's over. And so many things remain to be done. Our summer vacation is taking shape as we finally sat down to make plans -  the plans look great, and I'm so much looking forward to our summer break.
But right now we're running around like crazy to birthday parties, end-of-year parties, and spectacles. Somewhere in between big girl M. will have surgery which will finally take care of the resisting ear infection and accompanying hearing loss she has suffered from these last couple of months.

The picture above is from two weekends ago when M. had her friend over for a sleep-over. The sleep-over was lots of fun but unfortunately eventful too - as they were playing M. fell and chipped both her front teeth - oh, horror! - it's been taken care off now - on her birthday, of all days - more doctor visits, more running around...
Anyway, it was the last time I had the sewing machine out. Looking for a 'quiet' activity we made a couple of whimsical pillows together. They're really, really fun to make and absolutely easy to make too.  The perfect craft for a rainy afternoon or when seeking shade inside on those really hot days... I'm not sure I'll make it to my sewing machine again anytime soon. I did buy some really cute fabric on my last trip to Ikea and I'm dying to make some totes with it, but I've no idea when I'll be able to do so. I'll keep you posted...

And of we go now to our next activity! I hope you're having a great week!

Whimsical pillow

Friday 10 June 2011

Flower power :: a tutorial

flower power :: a tutorial

I most definitely did not need another purse. As a matter of fact, this week while carrying around a way too heavy purse I made the remark I would so much like to be "free" - I want to live a purse-free life. Why is it that men can leave the house with just a wallet and a set of keys and we carry around entire survival kits? Do I really need all this stuff? Let's face it: right now, I have in my purse

- a wallet
- another purse with change
- keys
- car keys
- sunglasses
- small pencilcase
- handsanitizer
- paper tissues
- several packs of chewing gum
- paper wrappers
- loose change
- organizer (although small, really heavy!)
- MOO cards (that's right! I didn't mention them yet but I ordered some MOO Mini Cards a little while ago - so cute!)
- pass Navigo (Metro travel pass)
- cell phone - which I usually can't find when it rings, because obstructed by all of the above
- a small umbrella
- card holder for store fidelity cards, membership cards ...
- a notebook
- a little pouch with medication and band aids

Surprisingly, I do not carry around any make-up, not even a lipstick.

But seriously: do I really need all of this? When I take out the umbrella you can rest assured it will start raining. And the girls only fall or get hurt when I don't bring any band aids. But one pen would do, wouldn't it, instead of a pencil case. And how about all the plastic cards from stores where I come only once in a while. And the organizer?

With that in the back of my mind and the upcoming vacation I thought I should try to go light again. And is there a better way of doing so with a brand new, cute little purse?

The inspiration for this one comes from a little purse my dad brought me from a business trip to Ohio - I was about twelve when I received it and I still have it. It was just the perfect size to hold a wallet and a set of keys and I used it way into adult life. It was handmade and all seams where sewn with leather strips - something you see showing up everywhere again lately (see also my bohemian belt). Hence the leather shoelace stitched seams. In addition, I decided to have a flower closure and since I liked the rough edges of the leather I chose to integrate these as well into the design. The body of the purse is made out of a single rectangular piece which makes it a really easy project.

What you'll need:

- a rectangular piece of leather
- leather scraps for the flower
- leather shoe lace for binding the edges (2), strap (2), closure and flower attachment (1)
- leather punch
- scissors, rotary cutters
- ruler and marker

flower power :: a tutorial


Instructions:

1. Cut your leather to size for the body of the purse. ~ pic.1

2. Make flower from leather scraps by cutting two flower shapes, one slightly bigger than the other. Punch two holes in each one (make sure they correspond to each other).

3. About 1 cm from the edge, mark where the holes should come, one every cm. Also punch two holes at the top fold (for the strap), four holes (two by two) near the bottom center for the closure loop, and two near the bottom of the flap for the flower (same distance between holes as in flower). ~pic.3

4. With leather punch, punch holes as marked. However, on the side seams skip the one at the bottom fold (marked with a cross in pic.3 - enlarge picture) on either side (left and right). ~ pic.4

5. Sew seams with shoe lace. Start and finish with a knot ~ pic.5

6. Attach the loop for closure as shown ~ pic. 6-7

7. Attach flower to the flap and secure with a knot at each end. ~ pic.7 and 9

8. Attach strap (I used two shoe laces for that, knotted together) ~pic.8

Designer notes: Except maybe for the punching part, this would be a perfect craft for the (older) kid. If you don't have any leather handy or do not want your kid to ruin some precious leather, try using felt or denim. In the latter case, no punching is required as one can just sew the seams with needle and thread. The flower can be made out of any material, really or replaced by a button.
Use your imagination and more importantly - have fun!

This little purse has exactly the right size to hold a small wallet, keys and a cell phone and will keep me company on the beach, hopefully soon!

Flower power :: a tutorial


As with all of my tutorials, please note, this tutorial is intended for personal use only. Therefore, do not reproduce, sell or commercialize in any form without permission. Thanks for understanding!


If you made something using a tutorial found on this blog or if you got inspired by something you found here, make sure to post your pictures here.

Tuesday 7 June 2011

ELEVEN!


Today!  
Really!? 
When did that happen? 
Overnight, it feels like...
She's growing up fast, our sweet baby M. ...

Wishing you a splendid birthday, my dearest big girl M. ... 
 
xo, Mommy

Thursday 2 June 2011

This is so N.E.E.T.!!

How N.E.E.T. is that!


Not too long ago, I was contacted by Stephanie at N.E.E.T. magazine. If I would be interested in doing a tutorial for the June issue - preferably a recycling project, something for summer. Did I need to think about that? No, of course not!

So, here it is, the latest issue of N.E.E.T. magazine - with my recycled plastic bag pompom flip-flops among tons of other great stuff. Really, I feel so proud to have my project featured in a stunning and inspiring online magazine like N.E.E.T.! N.E.E.T. has great photography, styling, DIY projects, ... Go check it out!
And make sure to go take a look at page 148 through 151 for some really cool DIY flip-flops! There's even a downloadable PDF... Not to be missed!