Friday 23 December 2011

// Happy Holidays //

// Happy Holidays //


I planned a couple more posts but I have too much on my plate right now to make it work.
So, rather than getting frustrated, I decided to sign off for the year.
Take care, everyone!  Enjoy the holidays and...
hope to see you back here soon!

Cheers,

Pascale
xo

Sunday 18 December 2011

Handmade holidays :: a DIY wreath

Handmade holidays


With only one more week to go before X-mas we felt we needed a little more deco around the house to get into the mood completely. The idea for the Christmas balls we got from the latest issue of Whip up's Action Pack. We made a whole bunch of them using fabric scraps, sequins, yarn, my favorite baker's twine and some lace we still had lying around. Three were used to decorate a (store-bought) wreath. The balls were attached using a hot glue gun. We tied two pieces of fabric scraps in a bow for the finishing touch and - VoilĂ !

Handmade holidays

Friday 16 December 2011

Action Pack : Issue 8 {Celebration}


Just a quick reminder there's a new Action Pack available with everything you need for succesful holidays and for keeping the kids (or yourself) busy on those long winterdays: recipes (we have our very own Speculaas recipe in there, with our very own secret Speculaas mix!), crafts, gifts, games, Christmas decorations, ...

And in case you ran out of gift ideas, how about buying the Action Pack 2011 Bundle including all 7 2011 issues? Go check it out!


Speculaas

Monday 12 December 2011

Christmas tree free holidays

Home made X-mas deco

We decided not to buy a Christmas tree this year but to come up with an alternative.
And this is what our alternative tree looks like: white semi-sparkly (semi because about 50% of the sparkles rubbed off already, but wiping down sparkles is nothing compared to cleaning up pine needles...)  branches picture (store bought, which is silly, I know, but we have no garden and I can't myself running through Paris with pruning shears without getting myself into trouble).

Home made X-mas deco

We decorated our branches with homemade salt dough ornaments. The idea for the salt dough ornaments I got here. They were fun to make and cost next to nothing. A fun detail: we only had organic flour, which makes these ornaments totally ORGANIC!  How about that?!

Home made X-mas deco

We used cookie cutters, red inked stamps and lace for  the decoration of the ornaments and my favorite divine baker's twine for hanging them.

Home made X-mas deco

The pictures are of poor quality because they were shot at night and I still hate using a flash. They're not crisp and sharp as usual but a little blur suits the subject, I thought...

Home made X-mas deco

Sunday 11 December 2011

Easy X-mas cards

Easy X-mas cards


Tonight little H. and I made a bunch of X-mas cards for the children at the local children's hospital - a great project initiated by a class parent.
We came up with several homemade cards. Unfortunately, I wasn't able to take pictures of them before they went in an envelope, except for this one, which I made earlier in the day. Very easy to make if you want to give this a try. All you need is a piece of vellum, some colorful sequins, card stock, some contrasting thread and a sewing machine...

Some of our other cards included fingerprinted moose and snowmen to which details were added using a felt tip marker (look here for inspiration), and a very cool Keith Haring inspired Christmas tree with presents and stars by little H.

Thursday 1 December 2011

Pretty in silk :: revisited

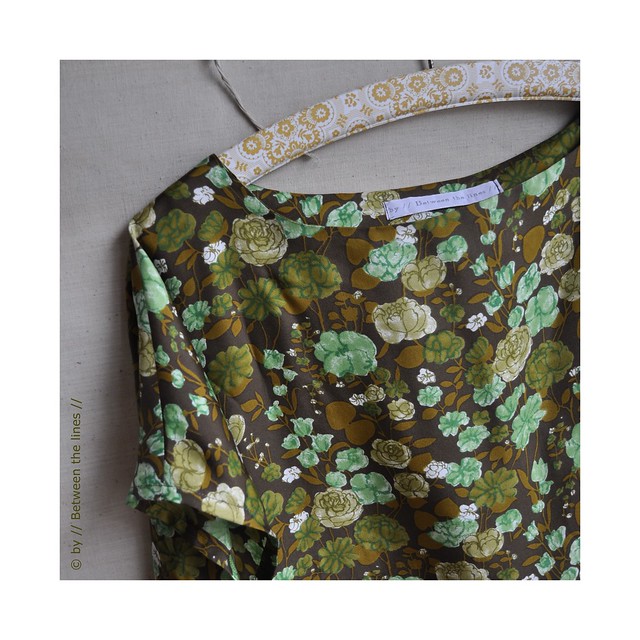
I have been sewing like crazy. Since I bought my new sewing machine last September, I made several skirts, a couple of silk blouses, a dress, a T-shirt for M.(found a very good pattern from Ottobre) and a sweater for her as well for which I made the pattern myself from an existing shirt. Unfortunately, the sweat-shirt shrunk terribly after washing and drying just once - it's just about the right size for little H. now, which she doesn't mind as the fabric is incredibly soft. Let's hope it won't shrink any further... Anyway, this wasn't today's topic. I just wanted to show you this tunic I made and which I really, really like.

I got inspired by these dresses/ tunics. With the orange flowery dress in mind I went fabric hunting and I found a very nice weight silk - a bit colorful, more colorful than I'm used to, with a vintage style print. As a matter of fact, the flower print might remind some people of their grandmother's apron (I certainly worked that way for me) but I found it very cute somehow. And although it's real silk I only paid €8.90/meter, which is cheap, I thought.


The pattern I used comes from the same Japanese sewing book as this blouse. It's the dress on the front cover (dress D in the book) which I slightly altered: I left out the sleeves, and made it slightly narrower. As a matter of fact, next time, I won't cut any (side) seam allowances, as the tunic turned out a little wide at first. As with my other silk blouses, I used French seams and finished off the tunic with a hand sewn hem - so much nicer.

... and matching jewelry


I wore the tunic to a party last weekend, combined with a long knitted jacket, tights and high boots and some last minute homemade jewelry. And it looked really nice, if I may say so myself. Since the dress has short sleeves, I'll be able to wear it in Summer too, probably over some white pants or a legging...
But let's get ready for winter first...