Saturday 31 March 2012

Bracelets, once more...

Rope bracelet

I don't know how your week has been, but mine was weird. And short.

Flat tire on Tuesday, right when we were supposed to head off to gymnastics. Had to go by bus which we missed, so we had to wait and hence M. was late.
Wednesday, I had to get the tire fixed besides everything else on a usual Wednesday . Thursday, I was supposed to prepare samples of crafts activities for an upcoming school event - I wasn't in a crafty mood, apparently, since nothing seemed to work out the way I wanted. On top of that a big photo frame came down from a shelf, shattered to pieces, glass everywhere and me almost having a heart attack from all the rumpus it made. It took me awhile to pick up the pieces and while I was vacuum cleaning the last bits, I decided to quickly do the kitchen floor as well. That's when I noticed a big puddle of water under the washing machine... It was close to pick up time from school and I was trying to find a leak... No way I could move the heavy machine on my own. So, it had to wait until K. got home. Nothing wrong with the machine - thank goodness - just one of the joints in the water pipe running behind the machine that gave up. The leak got fixed on Friday morning - no harm done.
And that was my week, sort of.
Good thing at least the weather was nice, which allowed a short stop at the park after school almost every day.

Rope bracelet

Anyway, yesterday while I was still thinking about bracelets for the upcoming school event, I came up with this twisted rope/embroidery floss bracelet. Easy to make and at very low cost. Make it longer, tie a knot at both ends and you have nice rope handles for a summer tote... I might try this actually, if I find a spare moment.

In the meantime here's a short how-to for the bracelets. The rope blends perfectly in with the new styles for summer: espadrilles, rope wedges... If you want a more finished look, instead of tying a knot attach a clasp.

Rope bracelet

All you need is embroidery floss, hemp rope, a pencil for twisting, and something to hold the rope while twisting (I used a piece of wood with a nail, a ring binder will work equally well).

1. Cut several strands of embroidery floss and one strand of rope, of equal length. Tie them all together to form a closed loop.

2. Place loop over the nail, or ring of the binder and slip your pencil through the loop at the other end.

3. Start twisting and continue until the twisted rope starts twisting onto it self. Redistribute where necessary to get a nice twisted rope. Tie a knot through the loop and done!

Make a bunch to cover wrists, ankles,... Make them smaller and you obtain perfect napkin rings for that first spring garden party (or autumn outdoor gathering if you happen to live on the other half of the planet). Just play around with it and have fun!

Well, it's not my best idea ever, but at least I have the feeling I did something creative this week!


Wishing you a nice weekend!
xo, Pascale

Monday 26 March 2012

And the winner is...

Zakka Style GiveawayBlogger


 Tania said...
Congratulations, and what a brilliant giveaway, thank you!
ollieandt@gmail.com
March 15, 2012 3:31 AM

Congratulations, Tania! I will send your information to C&T publishing and they'll take care of the rest!
Thanks again everyone for your enthusiasm about the book!!

Thursday 22 March 2012

Leather and gold bag :: the DIY instructions

Leather and gold bag :: DIY instructions


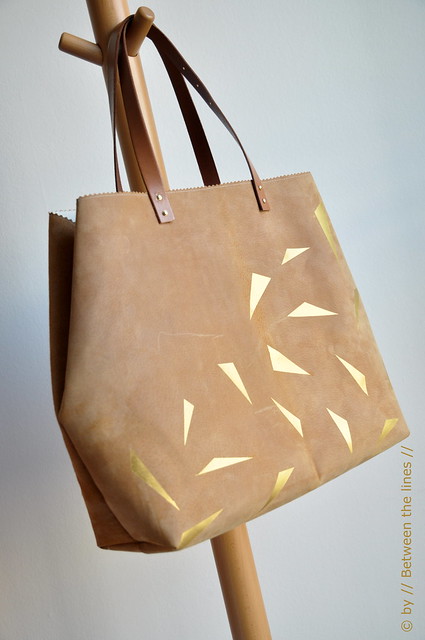
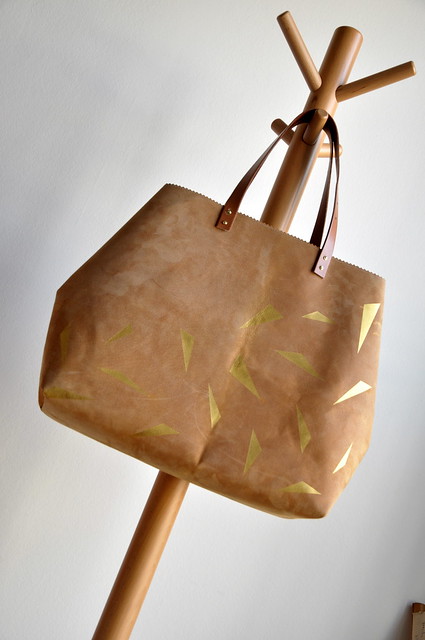
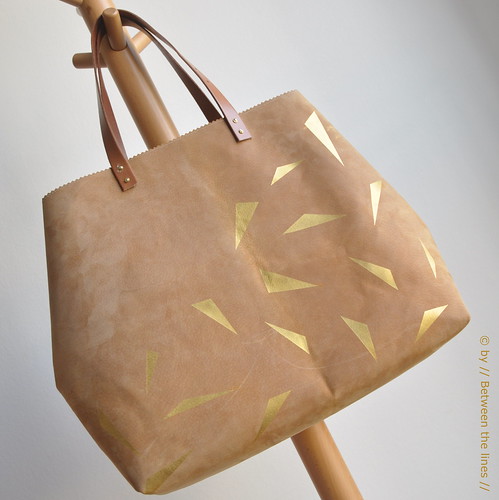
Thanks for the nice comments on my previous post! I've used my new bag every single day now and love it!
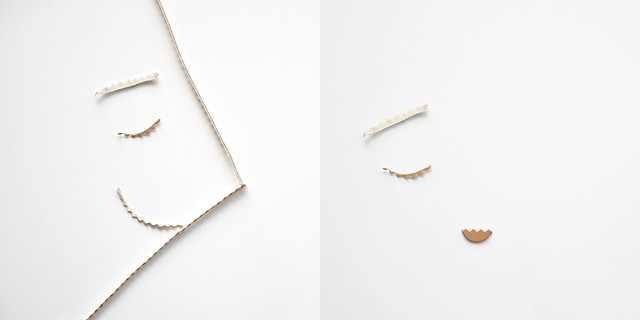
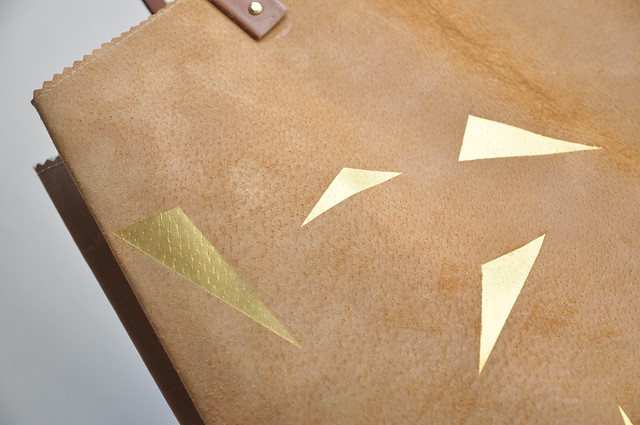
The gold triangles definitely amplify the first sun rays!!

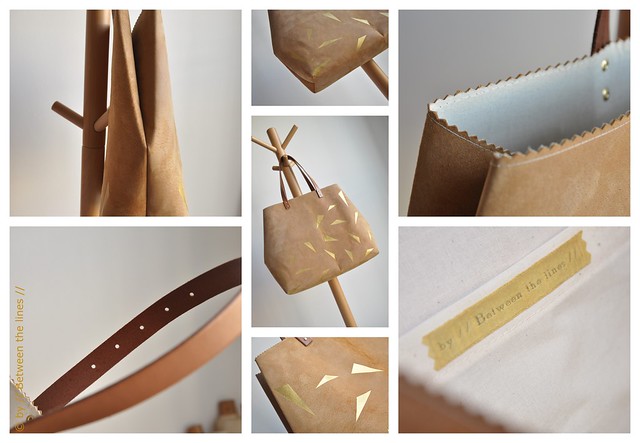
As promised, I wrote down the entire process - for me, so I won't repeat my mistakes and for you, so you can give this a try, since really, as scary as it may seem, leather actually is  a very nice material to work with. In this DIY, you will find some general information, instructions on how to paint on leather (illustrated with  pictures) and step-by-step (written) instructions for putting the bag together. I included the bag pattern as well.

Leather and gold bag :: DIY instructions

Leather and gold bag  :: the DIY instructions.

A few remarks in general:

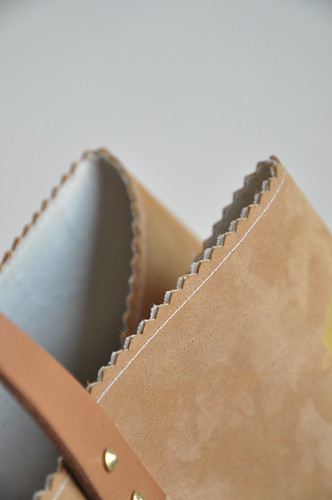
Before starting to paint on your precious leather skin, try a couple of samples first on a piece of scrap. This in order to see how well the paint works on the leather color wise as well as to determine the number of layers needed for a perfect coverage. Also, I tested several methods, from painters tape, washi tape, to Freezer Paper to set out the template on the skin and found freezer paper to work best. Both types of tape left marks on the leather and are more difficult to work with when you intend to repeat a certain pattern or have large surfaces to cover.

Before you start sewing the leather, again, try on a piece of scrap first, this to determine the correct tension and stitch length (avoid small stitches as this might result in ripped leather) and to get the right feel for sewing leather. Depending on your machine, you might notice you need to 'guide' the leather more than is the case with fabric as it doesn't slip that easily. The use of a special machine needle for leather is highly recommended.

Except for a leather sewing machine needle, a rotary hole punch and rivet setting tool, no special tools are required which makes this project really accessible.

Leather and gold bag :: DIY instructions


What you'll need:

- leather: I used pigs leather - at least 110cm x 60cm, for this particular model. Please, note that there's always a part of the leather you won't be able to use as the edges are never straight on a skin (you can use these parts to test the paint). So, make sure to take your pattern pieces with you when going to buy leather. If you have trouble finding leather, you can try the following alternatives: old leather jackets from the thrift store, faux leather (I prefer the real stuff, but these days you can find really good quality faux leather), canvas (use fabric paint in that case),...

- acrylic paint - I used Pébéo High Viscosity Studio Acrylics #352 Iridescent Gold

- paint brush

- Freezer Paper (or if you can't find any: try contact paper or blue painter's tape, but test first)

- optional: fabric for the lining - I used untreated muslin.

- optional: Vliesofix, Bondaweb if you decide to line the bag

- a belt for the straps (mine is a cheap leather belt from H&M) - you could cut your own, or use sturdy woven fabric tape

- rivets

- rivet setting tool (which I didn't have and now regret as they they got slightly bended using pliers)

- rotary leather hole punch

- cutting tools: rotary cutter and Exacto knife

- cutting mat, or something else to protect your working surface

- a bone folder

- pencil

- ruler

- long metal ruler (optional but recommended as it makes the cutting of the leather easier)

- (optional) pinking shears

- glue (any crafts glue really)

- sewing machine equipped with a leather needle

- iron and ironing board.


Step 1: Preparing the leather


Leather and gold bag :: DIY instructions


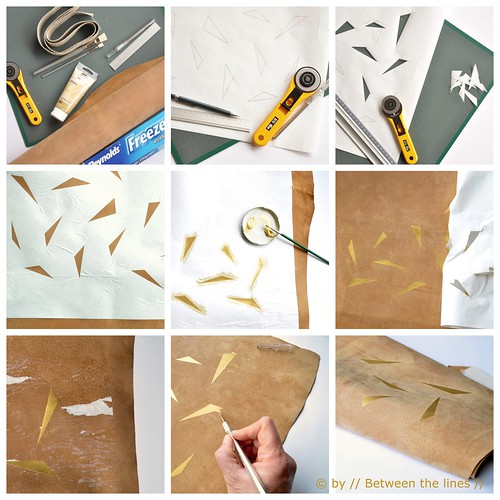
  1. Make a rough sketch of your design
  2. Transfer your design onto the freezer paper - if you intend to repeat the pattern on both sides of the bag, fold your freeze paper in two in order to make two templates in one go.
  3. With an Exacto knife cut out your design making sure to cut through both layers when making two templates.
  4. Position your template on your leather.
  5. Iron the freezer paper onto the leather (test on a piece of scrap first), with special attention for the edges of the cut outs - you do not want the paint to seep under the freezer paper. You can skip the in between areas. Note: make sure to iron without vapor!
  6. Before starting to paint, check the edges once more - it will save you from a lot of trouble later.
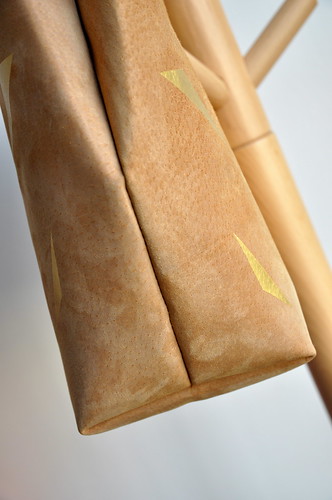
  7. Paint the cut out areas - let dry in between layers and repeat if necessary.  I did 3 layers.
  8. Let sit until dry to the touch and then gently start peeling off the freezer paper. If there happens to be some freezer paper residue, cover the area with a piece of paper towel, heat with an iron and then gently (!) scratch the remains with an Exacto knife. Use the bone folder to 'polish'.
  9. If some paint did seep under the freezer paper, gently(!) scratch the excess paint with an Exacto knife.

Step 2: Cutting the leather

Leather and gold bag :: DIY instructions

Place the above template onto the (back of the) leather. Check and check once more, reposition if needed and then trace with a pencil or marker. Cut out with a rotary cutter.
Note: Seam allowances (1cm) are included unless stated otherwise. I made my bag in one piece so at the bottom there's a fold and not a seam. This implies that the cut out for the boxed corner measures 5cm x 6cm. In case you work with a bottom seam add a 1cm seam allowance (hence the cut out becomes 6cm x 6cm).
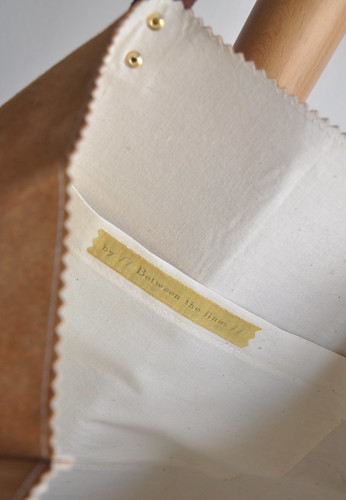

Step 3: Optional - Lining the leather 


Leather and gold bag :: DIY instructions


Since leather skins often have stamps or writing on the back and since I wanted to have a small pocket on the inside as well, I decided to line my leather and to do so before the sewing. I'm not sure this was the best method as the fabric came loose at a couple of spots. Much depends on the quality and weight of the Vliesofix used, I guess. Again, test on a piece of scrap first if your fabric will adhere to the leather or not. 
  1. Iron the Vliesofix onto the muslin ( not cut to size yet!). 
  2. Next, place the muslin with the Vliesofix facing down onto the back of the leather. 
  3. Peeling off the paper backing as you go, iron the muslin onto the leather, making sure there are no air pockets or wrinkles.
  4. Now cut the muslin to size.

Step 4: Sewing the bag

  1. Sew the side seams together, right sides (leather) facing. Note: one advantage of lining the leather is that since fabric is on the 'outside' while stitching, the layers will move under the presser foot with more easy.
  2. Trim away excess with pinking shears - you can also apply a tiny bit of glue onto the leather over the entire seam length.
  3. Sew the boxed corners.
  4. Trim away excess seam allowance and apply a tiny bit of glue in between layers.

Leather and gold bag :: DIY instructions


    Step 5: Attaching the handles

    1. Cut the belt to size to make two same length straps. 
    2. Make two holes on either end of both straps, corresponding to the size of the rivets used (check the instructions which came with the rivets  - here's a good tutorial for setting rivets (I wish I would have looked at this prior to making the bag)).
    3. Determine where you want the straps to come on the bag and mark the holes for the rivets using the holes already made in the straps, as a guide. Punch holes.
    4. Finally, punch rivets through both layers (strap and bag).

    Leather and gold bag :: DIY instructions


      Et voilà, un beau sac!!

      As with all of my tutorials, please note, this tutorial is intended for personal use only. Therefore, do not reproduce, sell or commercialize in any form without permission. Thanks for understanding!

      If you made something using a tutorial found on this blog or if you got inspired by something you found here, make sure to post your pictures here.

      Leather and gold bag :: DIY instructions

      Friday 16 March 2012

      Leather and gold

      Leather and gold

      A couple of months ago, I came across a very nice piece of pigs leather, not tanned and very soft. Surprised by how cheap it was (I couldn't believe it was actually real leather at that price) I couldn't resist and bought the skin. It took me some time to decide on how and what to use it for. I kept it neatly in my closet with a nice ribbon tied around it. Once in a while I would take it out, pat it, fold it, smell it. A bag for sure, but what kind of a bag? I went slowly on this project. At some point, I decided I wanted to paint on it - I had never done this before - I tested a couple of designs and colors on pieces of scrap leather and then I just went for it. Triangles. Gold.
      No way I'm a bling-bling girl, but given the subtle color of the skin a little bit of gold wouldn't harm, I thought. I tested a couple of techniques to get clean cut triangles onto the leather and went with freezer paper. It took me another week or so before I had the courage to actually cut up the leather and start sewing. I can't say all went well - there are a few flaws in both the design and the execution, but it doesn't look too bad for a very first, homemade, full leather bag.

      Next week, I'll give your more details on the process, but now, I'm off with my brand new bag!

      Wishing you a great weekend,

      xo, P.

      Wednesday 14 March 2012

      It's finally here... and a giveaway!

      Zakka Style

      Two summers ago, I got contacted by Rashida Coleman-Hale from Iheartlinen. If I wanted to contribute to a book on zakka style sewing. It was around the same time Kathreen contacted me for the Crafternoon series. I couldn't believe my luck!! Did I need to think about that? No, of course not!

      So, now it's finally here and I'm really, REALLY, proud to be one of the 24 contributors to this little gem. Because that's what it is. The book contains 24 sewing projects in typical zakka style. They make up for a perfect gift or a craft just to treat yourself. The simple yet stylish projects range from a tote, to a pincushion, nesting boxes, a messenger bag, a quilt and many more ... For the occasion I made an up-cycled version of this water bottle holder.

      More details about the book can be found here at the official Zakka Style page.

      And now the good news for you: Stashbooks at C&T Publishing is offering an e-book version of the book. To make a chance at winning this free copy, just leave your name and a valid e-mail address in the comment section of this post. You can do so until Friday, March 23rd, at noon UTC. The winner will be announced shortly after.

      So, good luck to you all!

      _______________________________________

      Comments are closed now - the winner will be announced shortly.
      Thanks for participating!

      _______________________________________

      Friday 9 March 2012

      Bits and pieces


      ... scraps of a new project I'm currently working on.

      All I can tell right now is that it involves leather, fabric and paint. I'm almost there - just need to add a couple of details.
      In the mean time, while tidying up this afternoon I had a little fun with the scraps.


      I'll be back next week with more and - it's been a while - a giveaway.

      So, stay tuned and have a great weekend!

      xo, P.

      Tuesday 6 March 2012

      Still there

      This way...


      I can't believe I've been absent here for an entire month.
      February flew by. We all got sick (and better again...) at the beginning of February - I even managed to be sick in bed on my birthday. And after that the girls had a two week break. One week was spent in the mountains which was really great. We were in good company, had great snow and the most lovely weather - what more could one wish for...

      And now we're back to normal, impatient for Spring to come - which won't be this week as temperatures were announced to go down again and the sky looks sort of grey.
      But that's ok as I have plenty of 'inside' jobs on my to do list still.
      I'll (try to) keep you posted...