Wednesday 30 October 2013

Halloween quick fix :: goggling eyeballs

Halloween DIY :: googling eyeballs

To be honest - Halloween hasn't really been on top of my priority list. It used to be our favorite event of the year. We'd put days (weeks) of preparation in it. But not anymore. A lack of exposure, I guess, ...

Halloween DIY :: googling eyeballs


Anyway, there must be something left, though, as I came up with this - true: totally miminimalist - craft yesterday. I can't remember what triggered it. Was it one of the girls rolling their eyes when being told to clean up their rooms?  Or was it my recent encounter with eye doctors, laser beams and dilated pupils. Not sure...


Halloween DIY :: googling eyeballs

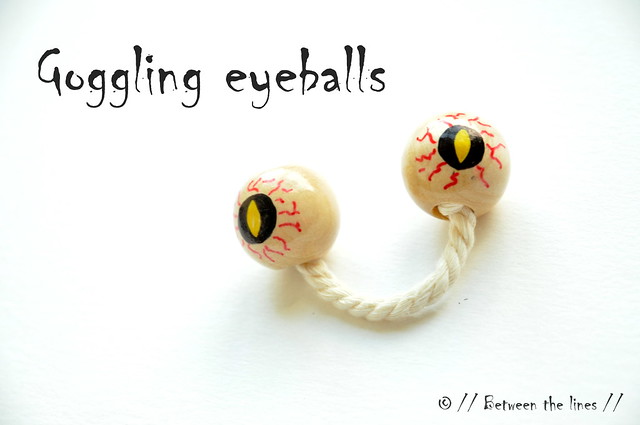
This craft is easy, fast, totally silly and totally last minute. All you need is two (wooden) beads (varnished/ glossy works best to get the real eyeball look), a piece of fat string, and permanent markers.

Halloween DIY :: googling eyeballs

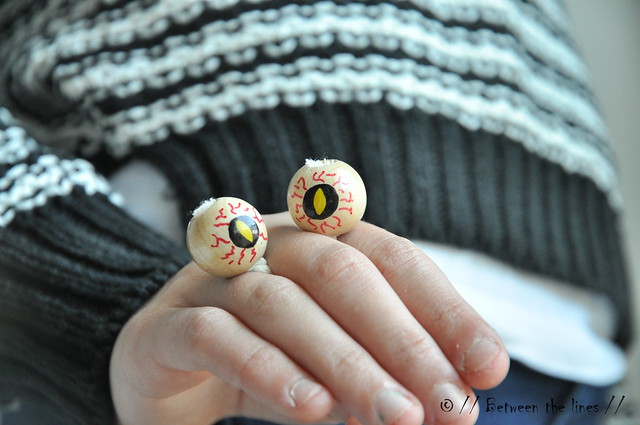
Slip the beads onto the string, tie a (double) knot on both ends and slip the beads over the knot to hide it (use a dab of glue if you're worried about losing an eye), cut off excess string and finally draw the eyes, with scary pupils, lots of bloody veins, ... Slip the eyeballs between your fingers and scare the crap out of everyone! For a better effect, you might actually want to use some face paint on your hand to make it look like a really scary face. Use your imagination!
Note: Due to choking hazard this item is not intended for young children.

Wishing you a happy and safe Halloween, everyone!

Cheers,

Pascale


Monday 30 September 2013

Colorful four strand round braid bracelets :: DIY


Four strand round braid bracelets

It's Fall. That's what the calendar says.

And even though it's probably about time to shed those summer bracelets, today, I'm going to show you some bracelets we've enjoyed making and wearing this Summer: four strand round braided bracelets.
You're probably familiar with the leather version of these bracelets - and that's actually how I got started. But one night I ran out of leather lace and I decided to give it a try with Scoobie Doo strands - to much approval from my girls the next morning.


Four strand round braid bracelets


Colorful, simple to make once you've got the hang of it, and very low cost.
So, if you want to hold on to that summer feeling for just a tiny bit longer, I recommend making a couple of these...


Four strand round braid bracelets


You will need: Scoobie Doo strands, 2 per bracelet.

Summarized and labeling each strand from left to right with a letter (A, B, C and D) the process boils down to the  repetition of the following 4 steps:

Four strand round braid bracelets


Four strand round braid bracelets


Four strand round braid bracelets


Four strand round braid bracelets


Four strand round braid bracelets


Repeat these four steps until the braid is long enough to fit around your wrist (or ankle). To lock the braid, tie a knot with one strand around the other three. 

Four strand round braid bracelets


To tie around your wrist pull two strands through the loop and tie in a knot with the other two!If the pictures aren't clear enough, I found this video tutorial to be very instructive and easy to follow. I use two strands folded in half instead of four, making sure to leave a loop at the top.

Note: in the pictures I taped the braid down. However, there is no need to do that - I did so because I needed to make a 'snapshot' of every step. It's much easier if you hold the braid between your fingers just like you do when braiding hair, for instance.


Four strand round braid bracelets


Four strand round braid bracelets


    Tuesday 10 September 2013

    Purses

    Purse

    Purse

    Purse

    Purse

    Purse

    Purse

    Purse

    Purse


    A few more purses I made over Summer.
    Just the right size to hold a phone, keys and some money.
    Instructions can be found here.

    Note: The dimensions of the purses above correspond to the ones given in the instructions - the bag in the previous post was made slightly bigger.

    Wednesday 7 August 2013

    I built a bag

    I built a bag

    I built a bag


    I built a bag


    I built a bag

    I built a bag


    I built a bag


    Inspired by the famous and oh-so-gorgeous Building Block Bags and with the help of this tutorial.
    This is the second one I made - I made this one slightly bigger than the first one.

    One for every occasion...

    Wednesday 31 July 2013

    T-shirt yarn macramé puppets

    T-shirt yarn macramé puppets

    Sitting on a mountain of old T-shirts?
    Bought some T-shirt yarn but never got around crocheting or knitting that rug?
    Or did you make that rug but you still have yarn left?
    Here's a fun craft making use of T-shirt yarn.

    T-shirt yarn macramé puppets


    These T-shirt yarn puppets were part of our school's Spring fair activities last June and I can immediately add that they were a big hit among all ages.
    It's a nice introduction to macramé as well.
    If you don't have T-shirt yarn you can cut your own from old T-shirts (you can find how to do this online). Or you could use fabric strips, bias tape, cord, ribbon, ...

    Slip the puppets on a key chain, use them to personalize school bags or make a bunch to make a cute mobile or garland for the nursery.

    Recommended age: 5+
    Required skills: ability to tie a knot
    Click here to download written instructions.

    T-shirt yarn macramé puppets

    Note: inspiration for this craft was found here. Just now, I also found this tutorial online.

    As with all of my tutorials, please note, this tutorial is intended for personal use only. Therefore, do not reproduce, sell or commercialize in any form. Thanks for understanding!

    If you made something using a tutorial found on this blog or if you got inspired by something you found here, make sure to post your pictures here.


    Saturday 27 July 2013

    Triangle open back shirt

    Triangle open back shirt :: a DIY

    Things are a bit slow around here but we're fine, enjoying our summer.
    And summer it is! Man, it's been hot around here - I can't remember it being this hot!
    Luckily, we were able to spend a few days away at the beach:
    - reading (I finally finished Gone Girl by Gillian Flynn - a disappointing read),
    - making bracelets,
    - swimming,
    - sipping cool home made hibiscus & cranberry juice tea (so good!!)
    - making a lovely little purse (more about that later)
    - and crafting this shirt for M.
    She'd seen a similar one, ridiculously expensive, at a boutique here in Paris. We both agreed this was something we could easily whip together ourselves!
    The result you see below - she's been wearing it like this or over a tank top in a contrasting color.
    Both are equally nice.

    So, grab those scissors!!


    Triangle open back shirt :: a DIY

    Sunday 30 June 2013

    Simple leather bag tutorial

    Simple leather bag tutorial


    I just finished another leather bag this afternoon and I love it.
    As a matter of fact, I just put it to the test and I find it perfect - very basic - very simple - just the way I like it.
    And you know what?!
    The instructions are down below, so you can make one too!
    This is an entry level project, so no special skills, nor tools are required.

    Simple leather bag tutorial


    Simple leather bag tutorial

    Simple leather bag tutorial


    Here's what you will need:

    The dimensions of the finished bag are: 38 cm by 40 cm

    - leather - I used a leather hide of approx. 0.55 m² but any large (combined) piece of leather would do
    - leather cording for strap (determine how long you want your straps to be, and add an extra 15 cm to each strap for knotting - so, if one strap measures x you will need 2(x + 15 cm) in total.
    - thread, linen or nylon, as long as it's strong
    - magnetic snap
    - 2 needles
    - pricking iron or a stitching awl
    - mallet, rubber or wooden hammer
    - hole punch
    - glue, a standard crafts glue is fine
    - optional: beeswax to wax sewing thread

    Simple leather bag tutorial


    Instructions:


    1. Cut a rectangle (or two rectangles of equal size if working with smaller pieces of leather) - in my case the rectangle was 39 cm x 80 cm. Next, make stitching holes along the long side for the side seams using a pricking iron, stitch punch or awl, about 0.5 cm from the side.
    2. Cut a piece of thread about 5 times the length of the seam you're going to sew. Thread a needle at each end and 'lock the needles' as is very well explained here. Next, sew the side seams using a saddle stitch, explained here. Note: in most stitching videos you'll notice people are using a stitching pony. I don't, for the simple reason I don't own one and I don't find it necessary. However, you could squeeze your leather in between two hardcover books held together with a a rubber band or belt. This should work equally well in my opinion.
    3. From the left over leather, cut six 5 cm squares.  Put four aside. Attach male and female part of a magnetic snap to the two remaining squares. If you don't know how to fix a magnetic snap check out this tutorial. Next, generously apply glue to the back of the magnetic snap squares and glue them into place onto the wrong sides of the bag, perfectly in the middle and about 3.5 cm from the top (measuring from the center of the snap). To make sure the glue/ square adheres, lightly hammer the square. Dab away any excess glue. Let dry.
    4. Determine where you want the straps to come. Then, position and glue  into place each of the four other squares which will serve to reinforce the leather where the strap holes come. Hammer lightly, dab away excess glue and let dry. 
    5. Mark the center of each square. Next, punch a hole with the leather punch. Repeat for the other squares. 
    6. Cut the leather cord to size, to make two straps. Tie a  double fisherman's knot at one end, thread through the hole as shown, thread through the other hole and finish off with another double fisherman's knot. Repeat with the second strap. And that's it!
    Simple leather bag tutorial


    As with all of my tutorials, please note, this tutorial is intended for personal use only. Therefore, do not reproduce, sell or commercialize in any form. Thanks for understanding!

    If you made something using a tutorial found on this blog or if you got inspired by something you found here, make sure to post your pictures here.

    Saturday 29 June 2013

    Summer vacation...

    Funny faces magnets

    ... starts right now!

    This school year was over in the blink of an eye, it feels like. I guess it means it was a good one!
    It also means we'll have to find activities to keep everyone busy and happy.

    How about making some more of these little fellows, a craft I did for our school's Spring fair. They're little magnets and very easy to make.
    All you need is wooden disks, or any other disks/ shapes you may have at hand - recycled cardboard might do the trick - magnetic tape for the back, a black pen and a tiny bit of wool roving or yarn for the hairdo. Though I'm really not good at drawing I had a lot of fun drawing the funny faces. I practiced on a piece of paper first, which could be an activity on its own. You really need to try this - after a while you'll you get the hang of it! Have fun!!

    Note: when using a black pen on wood, I recommend checking for bleeding in the back to avoid a disappointment...

    Wednesday 12 June 2013

    // SUMMER SALE //

    // SALE //

    Summer is still a little hesitant around here.
    But that's no reason not to kick off the by // Between the lines // Summer Sale.

    Enjoy a 20% discount on all items in my shop with this coupon code: BYBTL20
    You can do so until July 12th, 2013.

    // Happy Shopping //

    Monday 10 June 2013

    Friendship bracelets with a twist :: a DIY

    Friendship bracelets with a twist :: a DIY

    I can't believe how fast time is going. It feels like I've been on a speed train lately.
    The school year is almost over and this comes with a lot of activities and busy schedules.
    One of the things I have been busy with is helping organize the crafts activities for our school's Spring fair. The bracelets I'm showing today, were one of the activities I was responsible for and they were a huge success!  I originally found the technique here. They're simple to make and turn out to be really pretty when made with embroidery floss. Contrary to the usual friendship bracelets these are made in the round, which makes them look a bit like shoe laces. The nice thing about this method is that when you get tired of it you can just tuck it away to resume whenever you feel like it.

    The girls and I have made a bunch of bracelets already (one is traveling right now in little H's suitcase as a little surprise... ). It's a perfect activity for those boring and long train/ plane rides, to do while relaxing on the beach, or why not, while waiting at the doctor's office.  No special skills are required besides being able to count to three, which makes this an activity suited for even the little ones - as a matter of fact, this might be a fun way to help develop fine motor skills.

    This is what you'll need:

    • a piece of card board
    • something round to trace a circle (I was lucky to have a 1 3/4" punch, but a compass or glass work just as well)
    • scissors
    • embroidery floss
    Friendship bracelets with a twist :: a DIY

    Instructions: 

    Click here for the full instructions in English and here for the full instructions in French.


    Friendship bracelets with a twist :: a DIY


    Monday 20 May 2013

    Knitted summer bracelets :: a DIY


    Knitted summer bracelets

    I'm not sure these bracelets will become as popular as my 2010 summer bracelets, but they sure are equally fun to make!

    When I was looking for friendship bracelet ideas for our school's upcoming summer fest, I came across a 'knitting fork'.
    Since I don't have a knitting fork but liked the technique, I wanted to try and make a fork with what I had.
    Coincidentally, I made a Popsicle-stick-catapult just a couple of days ago, also for our school's craft fair and I figured that was the way to go.
    A Popsicle-stick-catapult turned into a knitting fork! Why not?!
    Talking about a multipurpose tool!
    The only change I made here is that I used two sticks for each leg to make it a little sturdier and I re-positioned the sticks slightly to get a fork-like tool. I limited myself to bracelets but the possibilities are of course endless. I'm thinking of necklaces, belts, bag handles... Use your imagination!

    Both, making the fork and the knitting, are very simple which makes this a perfect craft for keeping your kids, even the youngest ones - and yourself - busy on those long summer vacation car rides!
    The instructions, including a video I made, are below!

    Knitted summer bracelets


    Here is what you'll need:

    for the fork: (or catapult, if you like)

    - 8 popsicle sticks (for a catapult you will need 2 less)
    - 4 rubber bands

    for the bracelet:

    - yarn, T-shirt yarn, strips of fabric, leather lace, ... whatever you have on hands which could be turned into something bracelet like


    Instructions:

    1. Fork assembly

    Knitted summer bracelets

    2. Bracelet knitting

    To see the video in HD quality, click the settings wheel in the right hand corner of the black bar displayed at the bottom of the movie - select quality 1080p for the highest resolution.


    And here once more summarized in step-by-step pictures:


    Knitted summer bracelets

    As to the lengths of the strands of yarn to use: it all depends on the thickness and flexibility of the material you'll be using, so knitting a sample may be in order.

    Keeping my fingers crossed now for a long hot summer!

    Have fun fork knitting!

    Cheers,


    P.


    As with all of my tutorials, please note, this tutorial is intended for personal use only. Therefore, do not reproduce, sell or commercialize in any form. Thanks for understanding!

    If you made something using a tutorial found on this blog or if you got inspired by something you found here, make sure to post your pictures here.

    Saturday 18 May 2013

    In memory of Kathreen

    White flower 3


    I found out yesterday afternoon about the tragic death of Kathreen and her husband Rob.
    We never met in person but it feels like I lost a dear friend.
    She was one of the first ones to link to my early tutorials. Later she asked me if I wanted to become a contributor to the Crafternoon series and her kids magazine Action Pack.
    My oldest daughter became penpals with her daughter.

    We're devastated.

    Our thoughts and deepest sympathy go out to Kathreen and Rob's children, her family and friends.

    Pascale

    Note: If you feel like helping, I'm redirecting you to this post where you can find details about a fund for Kathreen's children.